
SupportLogic Security Overview
Trust and security are foundational to our business. Read about our approach to security, see our certifications, and how we secure your data.
Download Datasheet
SupportLogic pulls the data from your support ticketing system and analyzes it to create actionable insights and time-saving workflows for customer support managers, agents, customer success, and more. Signals and sentiment are extracted from your support cases and analyzed to generate early warnings, predict escalations, alert of potential customer churn, and surface coachable insights for your agents.
The data integration process is designed to be:
During onboarding, your data and case lifecycle are analyzed to include your existing customizations. Machine learning (ML) models are then tuned to your case history to deliver insights specific to your organization.
SupportLogic integrates with your identity provider to support single sign-on (SSO). IT involvement is required during onboarding to set up SSO permissions. In total, onboarding requires coordination across three integrations that typically involve IT:
This guide explains how your data connects to the pipeline and the process used to integrate your case history and custom fields.
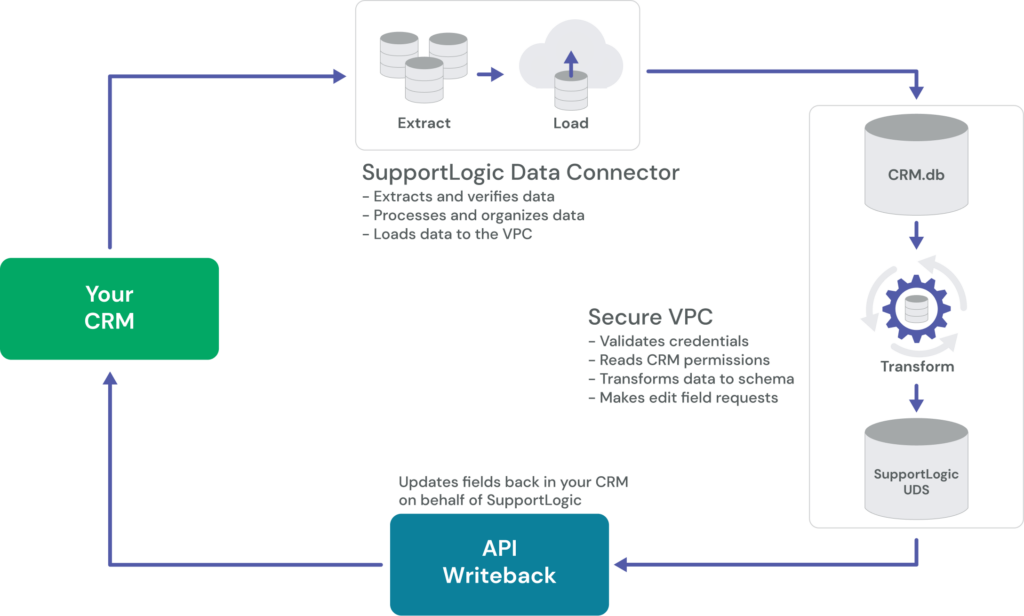
Your data is transformed through an ELT (extract, load, transform) connection. An ELT (rather than ETL) setup allows for a more robust integration, with the following benefits:
The data connector is TLS 1.2+ certified and runs securely over SSL using REST APIs hosted in an isolated virtual private cloud (VPC). From the VPC, your data is transformed using a set schema.
See Data Sync Detail and the diagram below for a high-level overview of the data pipeline.
SupportLogic takes the security of your data seriously. Several options are available for filtering any data you wish to exclude from the application. There are four ways to limit the data that gets processed:
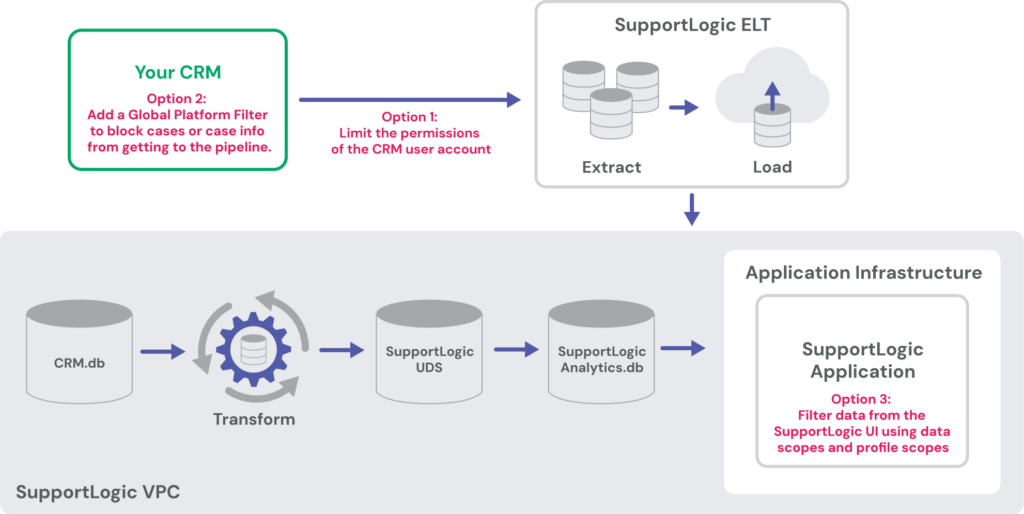
Data exclusion boils down to two methods:
Column-based exclusion: Columns are the data fields attached to each support case (date opened, case comments, requester name, and so on). The data connector performs this type of exclusion by default and certain columns can be excluded during setup.
Row-based exclusion: Rows are the actual support cases (each case represents a row in the database). There are multiple methods for excluding specific rows of data:
We integrate the custom fields in your standard tables as well as the custom fields in your custom tables and recommend syncing as many of your custom fields as possible during the initial sync. The following processes help capture your CRM customizations:
Customer Surveys
Lifecycle Walkthrough
We go through the typical lifecycle of a case, your escalation process, and any regular reporting performed across your cases, escalations, and agents. The following is also discussed:
SupportLogic supports bidirectional sync via a writeback API, enabling users to make updates to CRM records directly from within the SupportLogic interface. This capability simplifies workflows by allowing customer support managers and agents to take action on cases without switching systems.
Supported writeback actions include:
These actions are available once the appropriate write permissions are granted by your CRM administrator to the SupportLogic API user. During onboarding, you specify which case fields should be write-enabled. SupportLogic configures and tests the integration using sample data to ensure accuracy and reliability.
In addition to workflow actions, SupportLogic can push predictive signals such as sentiment and attention scores into your CRM. These scores are written to custom fields that are created collaboratively during onboarding, or they can be accessed via the Data Cloud. Once in your CRM, these scores can be used for reporting, filtering, and prioritizing cases.
SupportLogic offers embedded CRM widgets that allow your team to view SupportLogic insights natively within your CRM. There are two supported widget options:
The iFrame widget operates by dynamically inserting the SupportLogic case view into the CRM interface using the case ID. It becomes active once a case has been ingested into the SupportLogic platform, which typically occurs within 10 minutes of case creation.
SupportLogic also offers a custom-managed app version of the widget for customers who prefer to maintain their own deployment. This custom widget supports insights at the case, account, and agent levels and provides deeper contextual integration.
Supported platforms for the lightweight widget include Salesforce, Zendesk, Freshdesk, ServiceNow, Dynamics, and Jira.
Your SupportLogic Solutions Architect will work with your CRM administrator to configure the CRM widget.
SupportLogic integrates with both Slack and Microsoft Teams to deliver real-time, actionable alerts to your support and customer success teams. These integrations allow users to stay informed and take action without leaving their messaging environment.
Slack offers the most comprehensive functionality, including:
SupportLogic alert cards in Slack are designed to reduce context switching and help teams collaborate around real-time signals. Microsoft Teams support includes alert delivery and context, with Slack offering a broader range of in-message interactivity.
When you connect SupportLogic to your CRM, the signals in your ticketing system can be pushed to the Timeline or a Custom Object within Gainsight.
SupportLogic then connects to Gainsight via API. To enable this, we recommend that you create a user in Gainsight with appropriate permissions. On the SupportLogic side, you can provide Gainsight connection details such as Gainsight domain, Gainsight API key, and the email of the user that created for this integration. Once the connection is established, SupportLogic will automatically push notable events to Gainsight.
Three types of predictions are sent to the Gainsight Timeline:
For additional information on how signals appear on Gainsight, see the Gainsight integration page.
The initial integration can be done in less than 7 hours, with the total setup process typically taking 4-6 weeks. This process is spent understanding the nuances of your data and tuning it to match the schema. We spend the bulk of the time analyzing, understanding, and replicating your support model.
Data scientists then verify a series of test cases to ensure the machine learning models are processing correctly. At this point in the integration, we collaborate with you to ensure your case data is successfully translated, revisiting the mapping schema to fix any issues. Once the data schema is set, the previous year of your data is loaded and used to train the ML models to your specific customer and case history, setting trend analysis.
The ML models take your data and combine and manipulate it to create signals, sentiments, and new categories of data. Raw data elements are then combined with the frequency of tangential data points to create new metrics that are statistically analyzed. Our schema is centered around the following objects in your CRM system, each containing different types of data that help tune the ML models to accurately detect and predict.
For a detailed look at the minimum recommended data objects, see data schema by CRM at the end of this guide. For additional information on the usage of these objects, contact your SupportLogic Account Executive to speak with a Solutions Architect.
Ontology tuning means specific terms that appear in your support environment can be added to the application to make your workflow easier. For example, the term “network” can cover a collection of terms such as tcp, ip, tcp/ip, network, Ethernet, udp, ping, dns, and so on. When you search for “network” within SupportLogic, it automatically encompasses all the similar terms defined in your ontology. This enables you to search for terms and keywords across all cases, as well as report on occurrences of those terms.
The ML and workflows in SupportLogic SX are designed to give you fast time to value. After onboarding, we create a schedule to discuss your use of SupportLogic, capture any issues you may encounter, and discuss feature enhancements that can improve your experience as you use the application across your organization.
General Time Commitment:
Continue to the sections below for specific information on CRM setup and data schemas.
For additional details on data integration or to see a demo of the application, contact your SupportLogic Account Executive.
| Feature | Details |
|---|---|
| Syncing methodology | Differential incremental sync—never overwhelming your source. |
| Sync frequency | 5 minutes or more (1-minute sync planned). |
| Connectivity management | Completely self-service, integrated natively into the application. |
| Data blocking | Omits specific tables, rows, or columns from sync. |
| Column hashing | Anonymizes sensitive data. |
| Full re-sync support | Fixes data integrity issues with a full re-sync. Syncs can be performed at table level. |
| History | Maintains table history and tracks schema changes. |
| Priority first sync | Fetches most recent data first. |
| Connection status/alert | Sends automatic alerts to the destination of your choice. |
To connect your Freshdesk instance to SupportLogic SX, you need:
Find Subdomain
Find your subdomain in your Freshdesk URL. For example, if your URL is https://yoursubdomain.freshdesk.com, then your subdomain is yoursubdomain.
Find API Key
Finish Configuration
Work with a SupportLogic Solutions Architect to finish configuration:
| Object | Usage |
|---|---|
| company | Tracks back-and-forth conversations between your agents and the customer. Used to analyze sentiment. |
| company_domain | Tracks customer information. |
| agent | Tracks Freshdesk users (typically an individual account or user who has opened a case—this can be a customer or engineer). |
| contact | Tracks any user that does not have a full account in Freshdesk but has been attached to a case or case comment. |
| ticket | Tracks case information. |
| conversation | Tracks conversations and messages within cases. Used to analyze sentiment. |
To connect your Jira instance to SupportLogic SX, you need your Jira host name, your port, and a connecting user with the following permissions:
To connect your Microsoft Dynamics instance to SupportLogic SX, you need:
Find Domain Name
Find Resource URL
Finish Configuration
Work with a SupportLogic Solutions Architect to finish configuration:
| Object | Usage |
|---|---|
| account | Tracks customer information. |
| systemuser | Tracks Dynamics users (typically an individual account or user who has opened a case—this can be a customer or engineer). |
| contact | Tracks customer information. |
| incident | Tracks case information. |
| adx_ portalcomment | Tracks conversations and messages within cases. Used to analyze sentiment. |
| Tracks conversations and messages within cases. Used to analyze sentiment. | |
| stringmap | Tracks case history information. |
To connect your Salesforce instance to SupportLogic SX, you need:
Disable session IP locking
If you have Session IP Locking enabled or get an INVALID_SESSION_ID error, go to the Session Settings page and uncheck the Lock sessions to the IP address from which they originated box. It is very rare that this setting needs to be updated (<1% of cases), because by default it is already disabled for the majority of users.
Create new user and profile in Salesforce
To set up a Salesforce connector, you can use any Salesforce user within your organization that has permission to read data from Salesforce’s APIs. However, we recommend creating a dedicated user and limit data access for this user only to data you want to sync. You can limit data access for a user by creating a profile in Salesforce and assigning it to the user.
To create a new user and profile in Salesforce, do the following:
(Optional) Limit permissions to tables or columns
Data is synced based on the viewing permissions of the connected user. If you don’t want to sync a certain type of data to into your destination, limit the permissions of the connecting user. There are two ways to limit the data that we extract from your Salesforce account. You can either disable tables in the connector dashboard or limit the connecting user in Salesforce.
Option 1: Disable tables in the connector dashboard
If you are concerned about unintentionally syncing sensitive data to your destination, click the gear icon to open the Schema Change Settings menu, then select Allow columns.
Option 2: Limit the connecting user in Salesforce
SupportLogic connects to your Salesforce instance through the credentials of the connecting user, so to limit our access to the data, limit that user’s access.
You can do this in Salesforce through Permission Sets.
It’s best to limit the connecting user’s access before you initially connect the user through our setup form. Otherwise, you may have some dead objects in Salesforce that will no longer be updated after you’ve restricted the user’s permissions.
Finish Configuration
| Object | Usage |
|---|---|
| account | Tracks back-and-forth conversations between your agents and the customer. Used to analyze sentiment. |
| user | Tracks Salesforce users (typically an individual account or user who has opened a case—this can be a customer or engineer). |
| contact | Tracks any user that does not have a full account in Salesforce but has been attached to a case or case comment. |
| case | Tracks case information. |
| case_comment | Tracks all conversations and messages in a case. Used to analyze sentiment. Between email_message, case_comment, and case_feed, we must map at least one object that contains support conversations. |
| case_history | Tracks the history of actions in a case. |
| group | This contains the CRM queues needed to map. |
| record_type | Tracks group information. |
| email_message | Tracks conversations and messages within cases. Used to analyze sentiment. Between email_message, case_comment, and case_feed, we must map at least one object that contains support conversations. |
| Escalation | This is an abstract object we build to analyze escalations. We can also start from your custom escalation objects or custom fields within the Case or Task objects. |
To connect your ServiceNow instance to SupportLogic SX, you need to enable table auditing and a ServiceNow Service Account with access to the following tables:
Note: You don’t have to include the tables listed above to the connector schema. Including these tables only slows up the sync due to the large size of these tables.
Note: You can simply grant admin and snc_read_only roles to your service account if you want to avoid setting up complex ServiceNow access control lists.
Setup Instructions
Set Up OAuth
Finish Configuration
Work with a SupportLogic Solutions Architect to finish configuration:
| Object | Usage |
|---|---|
| core_company | Tracks customer information. |
| sys_user | Tracks ServiceNow users (typically an individual account or user who has opened a case—this can be a customer or engineer). |
| task | Tracks case information. |
| sys_journal_field | Tracks conversations and messages within cases. Used to analyze sentiment. |
| sys_history_line | Tracks case history information. |
| sys_history_set | Tracks case history information. |
To connect your Zendesk instance to SupportLogic SX, you need:
In Zendesk
Setup Instructions
Work with a SupportLogic Solutions Architect to finish configuration:
| Object | Usage |
|---|---|
| organization | Tracks customer information. |
| user | Tracks users of Zendesk (both customers and agents). |
| tickets | Tracks ticket information. Escalation is an abstract object we build, implemented as a custom field in the Tickets object. We track that a ticket was escalated and when it was escalated (and possibly when it was de-escalated if that occurrs before it is closed). |
| ticket_comment | Tracks ticket conversations. Used to analyze sentiment. |
| group | Tracks group information. |
Want the latest B2B Support, AI and ML blogs delivered straight to your inbox?

